Wednesday 28 January 2015

Chicken Broccoli Soup

Just a quickie today. This was my snack at work - chicken & broccoli soup with croutons and a mint chocolate. All served in my ComplEAT Energy Booster.

The soup was so simple - 500g chicken thighs, roughly diced; 1 head of broccoli roughly chopped, 500-750mL chicken stock, salt & pepper to taste. Pop it all into the Kambrook Soup Simple and select 'smooth'.

For the croutons I took some of our sandwich offcuts and tore into small pieces. Fry well in *lots* of butter and garlic.

What have you tried for your #52NewFoods challenge?


Details of my tools & toys can be found on this page.

~J

Disclosure: This is not a sponsored post. This post was written for Loving Lunches & 52 New Foods Challenge who generously provided me with a copy of their book. All opinions expressed are my own, based on my personal experience with the product. This post may contain affiliate links.

Monday 26 January 2015

ANZAC Ice Cream

Happy Australia Day! I was planning a special Australia Day Bento to post, but will pack it for Miss M's first day of prep tomorrow - how the time flies! Then I was going to post the ANZAC Pavlova I made, but think I want to finesse the recipe some more. So instead here's some ANZAC ice cream!
(NB this is not an original idea! I first tried this flavour combination in Homer Hudson 'Digger', designed by Pete Evans from memory. Sadly it seems this company is no longer with us)

Recipe modified from Stem Ginger Ice Cream in this book.
Heat 1 Tbsp honey in 150mL water, stirring until honey is dissolved. Set aside to cool.
Gently whisk 2 egg yolks until pale & frothy, then slowly add the honey mixture.
Fold in 600mL of lightly whipped cream.
Pour into a suitabe container & freeze until the edges of the ice cream start to. . .  well, freeze. Around 45 minutes.
Whisk again. You can either freeze & whisk one more time, or at this stage add your ANZAC dough (recipe in this previous post, you just want the dough, not the cooked biscuit). The amount of dough required varies by taste. I added quite a bit, then just tossed in the rest of the batch for good measure ;-)

Details of my tools & toys can be found on this page.

~J

Disclosure: This is not a sponsored post. This post was written for Loving Lunches. No product was received for this post. All opinions expressed are my own, based on my personal experience with the product. This post may contain affiliate links.

Friday 23 January 2015

Roast Pumpkin Cookie Fail

Have you stocked up your pantry ready for the back to school yet? I must admit I haven't :-( I tried the 100 biscuits recipe that's been getting around for a while and let's just say it won't be getting added to the repertoire.

I tried all the usual suspects - plain, sprinkles, sultanas, chocolate, and I wasn't impressed. Then I thought - why not pumpkin? Pumpkin scones are an absolute hit here so why not change things up a little?

Well. . . 

I mixed through some mashed roasted pumpkin (yes, I like a little colour on my roast veg) and sprinkled some with nutmeg, others with cinnamon sugar and a few were left plain. I didn't mind the cinnamon ones but I think I was the only one. *sigh*

But you know what? We gave it a go, and big smiles from Mummy for tasting (because 'trying' insinuates something might be difficult - the things you learn ^-^)

What have your tasted for the #52NewFoods challenge?

Details of my tools & toys can be found on this page.

~J

Disclosure: This is not a sponsored post. This post was written for Loving Lunches & 52 New Foods Challenge who generously provided me with a copy of their book. All opinions expressed are my own, based on my personal experience with the product. This post may contain affiliate links.

Wednesday 21 January 2015

Soup Maker Strawberry Fruit Leather

Did I really not end up sharing my attempts at making fruit leather last year? While I wouldn't say they were a complete success Wouldn't say they were complete failures either.


There were a few recipes online that basically involved blitzing fruit and/or water and/or sweetener. I chose to use my failed strawberry jam.


My first attempt turned out a little limp and undercooked.
So I popped it in for a little longer. . .
Perhaps that wasn't such a good idea o.O


So I tried again with the next batch, making it a little thicker this time
And a longer,slower cook time made a big difference too - only I forgot to take photos at the end - D'oh!


Did you know that trying an 'old' food in a new way still counts towards your #52NewFoods challenge?


Details of my tools & toys can be found on this page.

~J

Disclosure: This is not a sponsored post. This post was written for Loving Lunches & 52 New Foods Challenge who generously provided me with a copy of their book. All opinions expressed are my own, based on my personal experience with the product. This post may contain affiliate links.

Monday 19 January 2015

ComplEat Repurpose

Are you still finding candy canes and Christmas treats hiding in your kitchen? This little one made a perfect addition to my biscuits & dip work snack the other night :-)

Chicken Crimpy biscuits with Gherkin dip - my favourite combination! Served in my ComplEat Energy Booster from (affiliate) BioMe.

Details of my tools & toys can be found on this page.

~J

Disclosure: This is not a sponsored post. This post was written for Loving Lunches. No product was received for this post. All opinions expressed are my own, based on my personal experience with the product. This post may contain affiliate links.

Friday 16 January 2015

Teddy Bears Picnic Party - Part 3, Cake and Favour

This week I've been sharing all the fun we served for Honey's first birthday party. Here are the links if you'd like to check out our Savoury and Sweet posts. I saved the best for last - CAKE!

I am so very pleased with how her party cake turned out! Two small round vanilla sponges for the head and body, a few lines of Nutella and some Maltesers to decorate. Muffins for the paws and ears and a couple of snake lollies for the antennae. I had to add a couple of choc drop bumble bees too, just because :-) You can see more detail about the them in the Sweet post.
I think the larger cake rounds made a real difference from our practice run which we used for her actual birthday. This one was made with muffin and mini-muffin size chocolate cakes, because it's not a birthday without Grandma's chocolate cake ;-)

Iced with chocolate icing and decorated with marshmallows, mini marshmallows and FooDoodler.

But I didn't let her have the whole cake - Honey got a muffin.

And because I haven't shared them before, these are the cakes I made for Miss M's first birthday and her party.

Store bought slab cake with icing and green coconut, decorated with tiny teddies and some goodies from my craft supply cupboard. Perfect for our party at the park, well away from home.

The large round cake was our family cake for her actual birthday. Muffins, marshmallows, smarties and chocolate covered snake for decoration.

Then she had a muffin decorated with mini muffins, smarties, and half a chocolate covered snake.

I also loved the little favour boxes we made up. These came yellow and white striped, but a little Nikko/Texta soon helped to bring them up to speed with our theme. Some googley eyes stuck on with mounting tape for a face and a Hershey's Kiss for a sting. Completed with some black and yellow ribbon for wings. Perfect for little hands.
Inside each box there were a few balloons, a party blow-out and a small bottle of bubbles. There's not much more one year olds wish for in life, is there?
Admittedly my bumble bee bubbles weren't quite as cute as their Pinspiration, found here, but I still think they turned out great.

And Miss M had a great time helping out too :-)


Details of my tools & toys can be found on this page.

~J

Disclosure: This is not a sponsored post. This post was written for Loving Lunches. No product was received for this post. All opinions expressed are my own, based on my personal experience with the product. This post may contain affiliate links.

Wednesday 14 January 2015

Teddy Bears Picnic Party - Part 2, Sweet


Earlier this week I shared the savoury snacks from Honey's first birthday party.  Welcome to part two of the series where you can see some of the sweet treats that were on offer.
Last week I shared my practice run for these cute little teddy bear paw cakes.

I stuck with crown biscuits and Maltesers for the large paw and choc melts with choc drops for the small paws. The bear muffin cases I picked up from the local $2 shop.
I had some cute bumble bee muffin cases in my silicon stash, too. Using a small sauce dispenser I drew some Nutella lines onto the cake batter before baking.

I think they turned out quite cute, don't you?
I also added the decorations while the cakes were still warm and fresh from the oven, meaning I didn't have to add icing, cutting down on sugar which is always a good thing when there are little ones involved.
Teddy Bear Picnic
I was also rather happy with these little Milk Arrowroot bumble bees. Held together with a smear of butter and then decorated with butter and Nutella or Vegemite. Served in flower muffin cases.
But I think my favourite sweet treats from the day were these gorgeous little Bumble Bee Chocolates. I can't claim them completely, they were inspired by this cake.

I did try using a FooDoodler but found a little melted milk chocolate worked better. Using a ziplock bag with the corner snipped I piped on the detail.
A few times. . .

Quite a few times. . .

And then added mini marshmallows that had been slightly squooshed (being the technical term) into wing shapes.
It was a warm day and I was impatient, which worked well as the marshmallows stuck nicely to the chocolate lines.
Special thanks go to Cousin B and Miss M who helped immensely with these beauties.
Lots of beauties.
A bevy of beautiful bumbly bees!

If you'd like to see the savoury selection, check out this previous post.

And when the times comes, this link will take you to the cake and favour post from this series.

Details of my tools & toys can be found on this page.

~J

Disclosure: This is not a sponsored post. This post was written for Loving Lunches. No product was received for this post. All opinions expressed are my own, based on my personal experience with the product. This post may contain affiliate links.

Monday 12 January 2015

Teddy Bears Picnic Party - Part 1, Savoury

I can hardly believe our little Honey celebrated her first birthday 4 months ago! Where has the time gone? And I can hardly believe it's taken me so long to share all the glorious goodies from her party!

We decided that for Miss M's first birthday party we'd have a Teddy Bears' Picnic. I thought it was a cute enough party for a one year old, and was gender neutral enough that for any future additions to the family we could easily replicate it. I was busily Pinning ideas when I saw a Winnie the Pooh dressed up as a bumble bee. I had a light bulb moment and though that would be the perfect take on a Teddy Bear's Picnic for our little Honey (Bee).
We had a small gathering in a local park so everything had to be easily transported and/or assembled 'on site'.

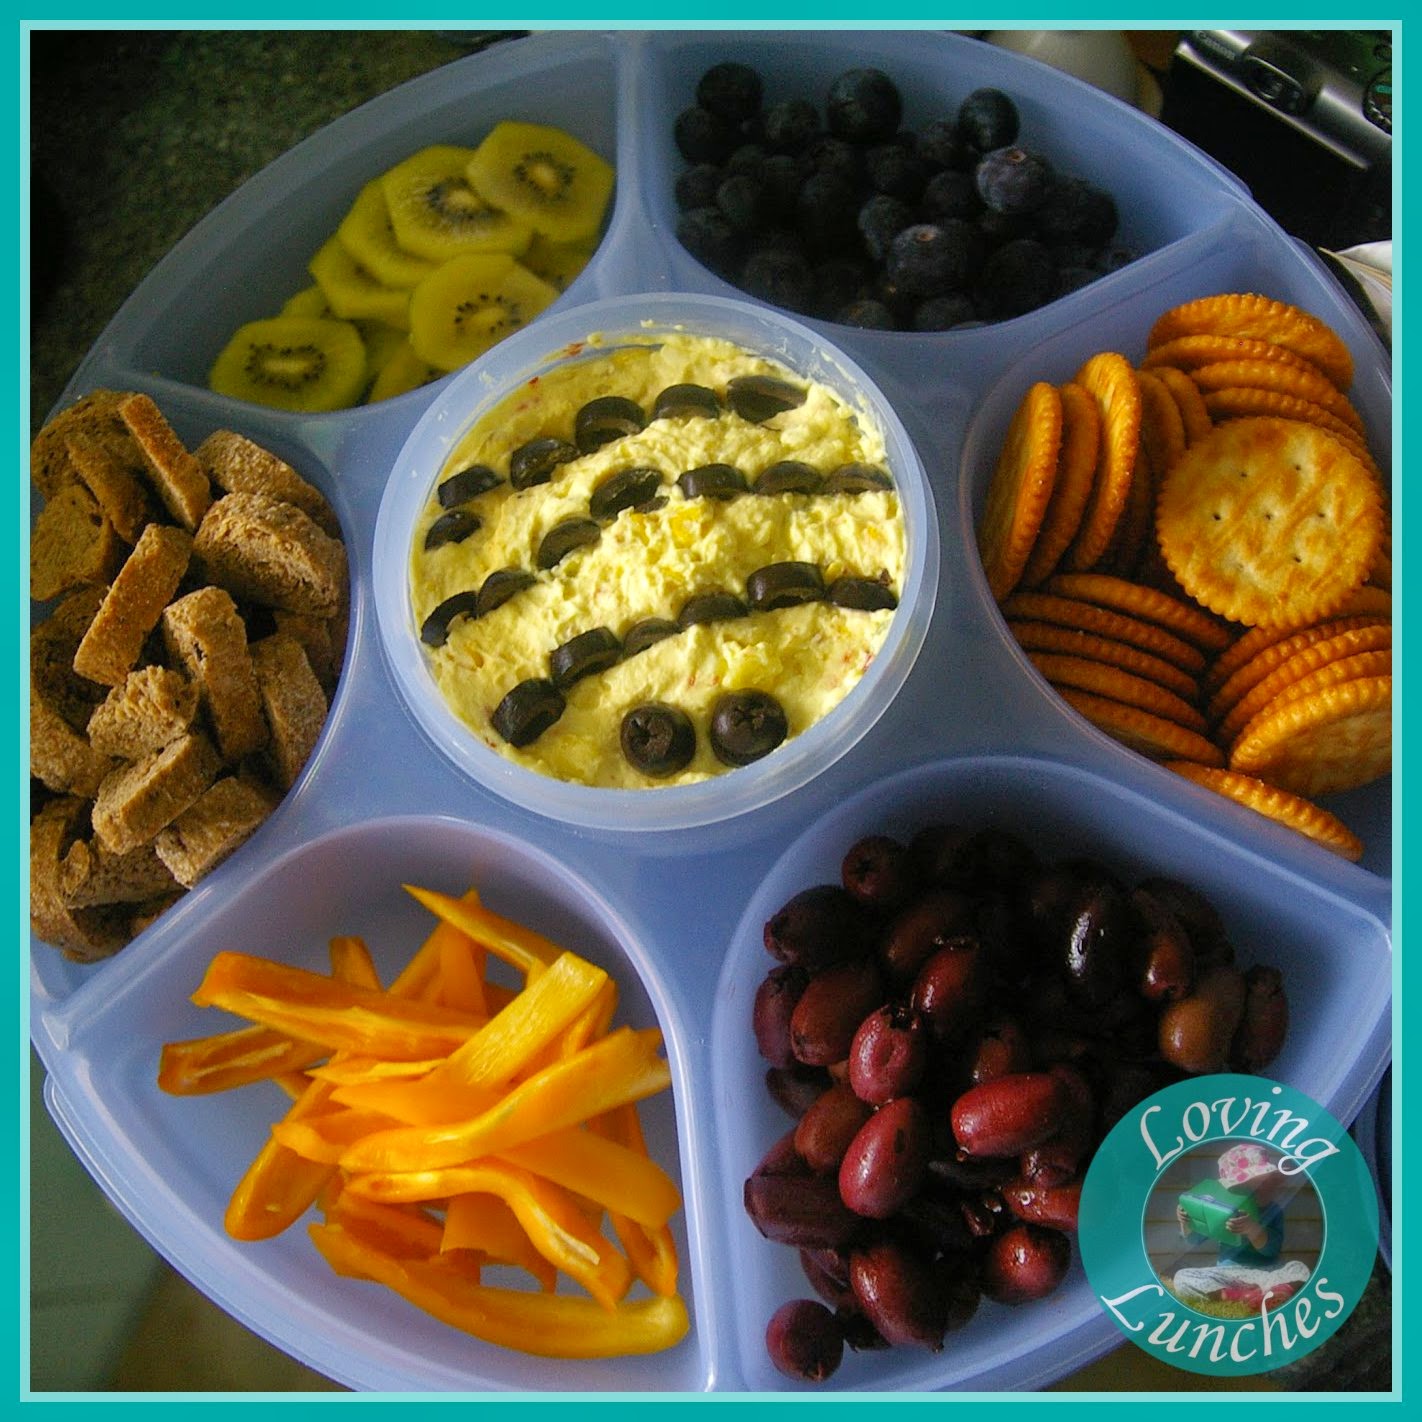
I made up some simple yellow (corn relish and Philly cheese) dip and added a few olives to create a bee look in the centre of my Tupperware chip 'n' dip. Then each section was filled with alternating black/yellow goodies. Yellow Kiwi fruit, blueberries, Ritz/Jatz, olives, yellow capsicum, and store bought olive bread.
I was so chuffed with how these bumble bee  curried quail eggs turned out!
Served on a (washed, new) paint tray, the centre holds a container of curried mayonnaise, and each bee is decorated with nori detail and cucumber wings.

The eggs were coloured following this fantastic tutorial from Little Miss Bento.
There were a few leftover so they were sliced in half and laid upon their cucumber wing slices with a dollop of the curried mayo.

Then there was the bee hive inspired cob loaf!

The top layer was a simple hamburger bun, while the centre held all the yumminess that is a classic cob loaf. The bottom layer was a damper. All the bread store bought. To make the cheesey filling I basically followed the topping I use when making sour cream potatoes.

Blanch some spinach leaves, fry some bacon and a little onion. In a saucepan melt together equal parts of sour cream and grated cheese (like mozzarella) with a generous helping of butter. Add your spinach and bacon mixes and stir to combine. Fill your hollowed out cob loaf with the cheese mix and bake until golden.

Cut from the menu were these cute muffin pizzas. Store bought english muffins topped with pizza sauce, cheese, pepperoni and cheerio slices.

Stay tuned this week for more Teddy Bear Picnic fun! After publishing, you will be able to click through to see:
Part 2, Sweet and
Part 3, Cake!

Details of my tools & toys can be found on this page.

~J

Disclosure: This is not a sponsored post. This post was written for Loving Lunches. No product was received for this post. All opinions expressed are my own, based on my personal experience with the product. This post may contain affiliate links.

Friday 9 January 2015

Teddy Bear Paw Cupcakes

Don't you love easy decorating cakes? I was Pinspired by this image but it seems the link to the original source is corrupt :-(

I made these for a take-a-plate Teddy Bears Picnic last year. They were the perfect practice run for Honey's first birthday party which I will finally get around to sharing with you next week!

These simple vanilla sponge muffins were iced with buttercream icing and topped with Maltesers and alternating Mint and Crown biscuits.


I had to make chocolate too.

I always prefer chocolate :-)


Details of my tools & toys can be found on this page.

~J

Disclosure: This is not a sponsored post. This post was written for Loving Lunches. No product was received for this post. All opinions expressed are my own, based on my personal experience with the product. This post may contain affiliate links.

Wednesday 7 January 2015

Market Stall Lunches

 I was very excite to hold my first market stall in December 2014, selling some Bento goodies. If you are in the Emerald, QLD area and would like some more information, please drop me a line: LovingLunches at gmail dot com  :-)

This is the 'display' lunch I made. As it was on display for a few hours with the lid open and many flies appreciating the work it wasn't consumed, but it did look appetising!


The sandwich was actually just the crust with a CuteZCute cute out turned over. I added a few 'pig noses' for the tentacles with the centre circles being made from the crusts. The off cut circles became 'bubbles'. Eye picks and a pig-ear cut out, again from crust complete the look. I've been wanting to make a CuteZCute Octopus ever since I saw this adorable post. What do you think? Did I do the original justice?
Some more cute eye picks and some FooDoodlers turned a couple of cheerios into Octo-dogs which are always a winner for us.
And our fish egg mould egg had a swim in some lettuce 'kelp'. A couple of the circle bread off cuts from the sandwich  acted as bubbles and a little colour added with FooDoodlers.
Then this was my actual nibble-all-day-long lunch. A couple of store bought finger laminations, some Tic Tacs, and a whole heap of local grapes. All served in Easy Lunch Boxes.

I had such a wonderful time meeting so many lovely locals and sharing the Bento love with my community. I look forward to lots more Bento action in town, stay tuned!

If you would like to sign up for our Loving Lunches Locals email, you can do so via this link. I intend to keep the blog more focused on food rather than sales ;-)


Details of my tools & toys can be found on this page.

~J

Disclosure: This is not a sponsored post. This post was written for Loving Lunches. No product was received for this post. All opinions expressed are my own, based on my personal experience with the product. This post may contain affiliate links.
Pin It button on image hover